 For this tut you will need the following:
Paint Shop Pro, any version should work, I am using 10.
A tube of your choice. I am using the awesome artwork of Ismael Rac which you can purchase at AMI.
Scrap kit of choice. I am using My Bloody Wedding by Addicted2Scraps. It is a PTU kit.
Template 52 by Linda which can be found at the Creative Misfits blog. It's the second one down, just click on the set and you'll be taken to the download.
Font: I used Carlotta.
Plugin: (optional) I used Eye Candy 3.1 Glow to put the glow on my name.
Let's begin!
Open your template and delete the top credits layer.
Make the black circle layer active and click inside it with your magic wand. Open a black paper from the kit, copy and paste as a new layer, resize if necessary. Selections, invert, make sure you are on your paper layer, and hit delete on your keyboard. Leave selected.
Copy and paste your tube as a new layer and arrange it in your circle. Use your eraser tool to erase the bits you don't want hanging over the bottom of your circle. Deselect and add a drop shadow to your tube. Delete the original circle layer.
Hide your tube and circle layer.
Take your selection tool and draw out a rectangle starting at the top edge of the blue part of the glittery frame circle. Open a red paper, copy and paste as a new layer, selections, invert, and hit delete on your keyboard then deselect.
Now back on your glitter circle, selections, select all, float, defloat, invert, on that paper layer you just did above, make that layer active then hit delete on your keyboard. Now the red paper should be a half circle just covering the blue area. Now go to adjust, add/remove noise, and add noise with 100%, uniform and monochrome checked. Merge this red layer down with the glitter circle layer and add a drop shadow. Unhide your tube and circle layers.
Activate the large rectangle layer, click inside it with your magic wand. Open another black paper, copy and paste as a new layer. Selections invert, hit delete on your keyboard. Add a drop shadow.
Do the same for the Rectangles layer.
Do the same for each of the remaining blue layers, but use a red paper to fill them in. On the glittery text and stars layers, Add noise to it just like you did with the half circle layer.
Open element 60, copy and paste as a new layer, arrange to the top left, and then drag it to the bottom and then add a drop shadow.
Add any other elements you might like. I didn't add anything besides that last one. You can also add a mask if you'd like.
Add your copyright info and your name.
Crop it down, resize if necessary, delete the white background layer and save as a .png so it's transparent.
For this tut you will need the following:
Paint Shop Pro, any version should work, I am using 10.
A tube of your choice. I am using the awesome artwork of Ismael Rac which you can purchase at AMI.
Scrap kit of choice. I am using My Bloody Wedding by Addicted2Scraps. It is a PTU kit.
Template 52 by Linda which can be found at the Creative Misfits blog. It's the second one down, just click on the set and you'll be taken to the download.
Font: I used Carlotta.
Plugin: (optional) I used Eye Candy 3.1 Glow to put the glow on my name.
Let's begin!
Open your template and delete the top credits layer.
Make the black circle layer active and click inside it with your magic wand. Open a black paper from the kit, copy and paste as a new layer, resize if necessary. Selections, invert, make sure you are on your paper layer, and hit delete on your keyboard. Leave selected.
Copy and paste your tube as a new layer and arrange it in your circle. Use your eraser tool to erase the bits you don't want hanging over the bottom of your circle. Deselect and add a drop shadow to your tube. Delete the original circle layer.
Hide your tube and circle layer.
Take your selection tool and draw out a rectangle starting at the top edge of the blue part of the glittery frame circle. Open a red paper, copy and paste as a new layer, selections, invert, and hit delete on your keyboard then deselect.
Now back on your glitter circle, selections, select all, float, defloat, invert, on that paper layer you just did above, make that layer active then hit delete on your keyboard. Now the red paper should be a half circle just covering the blue area. Now go to adjust, add/remove noise, and add noise with 100%, uniform and monochrome checked. Merge this red layer down with the glitter circle layer and add a drop shadow. Unhide your tube and circle layers.
Activate the large rectangle layer, click inside it with your magic wand. Open another black paper, copy and paste as a new layer. Selections invert, hit delete on your keyboard. Add a drop shadow.
Do the same for the Rectangles layer.
Do the same for each of the remaining blue layers, but use a red paper to fill them in. On the glittery text and stars layers, Add noise to it just like you did with the half circle layer.
Open element 60, copy and paste as a new layer, arrange to the top left, and then drag it to the bottom and then add a drop shadow.
Add any other elements you might like. I didn't add anything besides that last one. You can also add a mask if you'd like.
Add your copyright info and your name.
Crop it down, resize if necessary, delete the white background layer and save as a .png so it's transparent.

Sunday, February 21, 2010
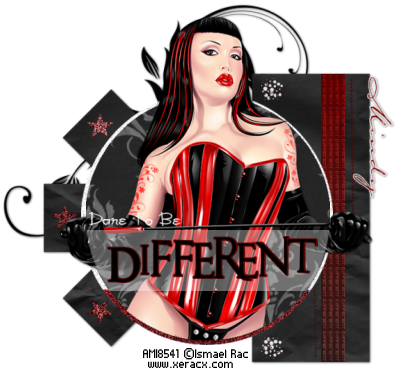
Dare to Be Different
For this tut you will need the following:
Paint Shop Pro, any version should work, I am using 10.
A tube of your choice. I am using the awesome artwork of Ismael Rac which you can purchase at AMI.
Scrap kit of choice. I am using My Bloody Wedding by Addicted2Scraps. It is a PTU kit.
Template 52 by Linda which can be found at the Creative Misfits blog. It's the second one down, just click on the set and you'll be taken to the download.
Font: I used Carlotta.
Plugin: (optional) I used Eye Candy 3.1 Glow to put the glow on my name.
Let's begin!
Open your template and delete the top credits layer.
Make the black circle layer active and click inside it with your magic wand. Open a black paper from the kit, copy and paste as a new layer, resize if necessary. Selections, invert, make sure you are on your paper layer, and hit delete on your keyboard. Leave selected.
Copy and paste your tube as a new layer and arrange it in your circle. Use your eraser tool to erase the bits you don't want hanging over the bottom of your circle. Deselect and add a drop shadow to your tube. Delete the original circle layer.
Hide your tube and circle layer.
Take your selection tool and draw out a rectangle starting at the top edge of the blue part of the glittery frame circle. Open a red paper, copy and paste as a new layer, selections, invert, and hit delete on your keyboard then deselect.
Now back on your glitter circle, selections, select all, float, defloat, invert, on that paper layer you just did above, make that layer active then hit delete on your keyboard. Now the red paper should be a half circle just covering the blue area. Now go to adjust, add/remove noise, and add noise with 100%, uniform and monochrome checked. Merge this red layer down with the glitter circle layer and add a drop shadow. Unhide your tube and circle layers.
Activate the large rectangle layer, click inside it with your magic wand. Open another black paper, copy and paste as a new layer. Selections invert, hit delete on your keyboard. Add a drop shadow.
Do the same for the Rectangles layer.
Do the same for each of the remaining blue layers, but use a red paper to fill them in. On the glittery text and stars layers, Add noise to it just like you did with the half circle layer.
Open element 60, copy and paste as a new layer, arrange to the top left, and then drag it to the bottom and then add a drop shadow.
Add any other elements you might like. I didn't add anything besides that last one. You can also add a mask if you'd like.
Add your copyright info and your name.
Crop it down, resize if necessary, delete the white background layer and save as a .png so it's transparent.
Subscribe to:
Post Comments (Atom)
No comments:
Post a Comment