 For this tutorial you will need the following:
Paint Shop Pro, I am using PSP X, you should be able to use any version.
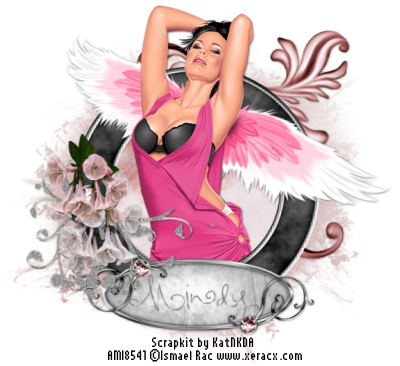
Tube of choice, I am using the artwork of Ismael Rac, which you need a license to use. You can get it at AMI.
Scrap kit of choice. I am using Night Wings by Kat NKDA which is a PTU kit that you can also purchase at AMI.
Font of choice, I am using Pea Lovey Dovey
Mask: I am using the mask that came with the Night Wings kit.
Plugins: No outside filters used.
Just remember that my choices of papers and elements is just a suggestion, change it up and make it yours! You don't have to follow mine exactly.
Let's get started!
Open a new canvas 700x700 white.
Open element 13, copy and paste as a new layer and resize by 45%. Click inside it with your magic wand, selections, modify, expand by 8.
Open paper 2, copy and paste as a new layer, selections, invert, make sure the paper layer is active, and click delete on your keyboard. Leave selected
Open your tube, copy and paste as a new layer and drag it below the frame. Take your eraser and erase the bits you don't want showing at the bottom of your frame and then deselect. Add a drop shadow. I used 1, 1, 35, 6.
Now take your freehand selection tool (the one that looks like a lasso) and make sure it's set on Add(Shift) and that Feather is set to 0. Draw around the parts you want showing above the frame. Go to selections, promote selection to layer, then select none. Now move the layer you just made above the frame.
Open element 1, copy and paste as a new layer, resize by 20% then again by 40% and then sharpen. Arrange it to the left side of your frame and add a drop shadow.
Do the same with element 2, arrange it just under element 1.
Open element 10, copy and paste as a new layer, resize by 40%, add a drop shadow and arrange to the top right, drag down below the frame and paper layer.
Open element 28, copy and paste as a new layer, resize by 40%, rotate to the right by 105, add a drop shadow, drag it below your top tube layer.
Open element 15, copy and paste as a new layer, resize by 40%, add a drop shadow. Drag it below element 28 and arrange it across the bottom of your frame.
Open paper 12, copy and paste as a new layer, drag it down to just above your white background layer. Open your mask, apply by going to Layers, New Mask Layer, From Image, click on the drop down menu and find your mask, click ok. Delete the mask layer and merge the group.
Add your name to the little metal piece (element 15) that you placed at the bottom of your frame. To get the engraved look, I did the text in black and then added my drop shadow. Then applied 3D effect cutout with the following settings:
Vertical: 10
Horizontal: 10
Opacity: 50
Blur: 5
Shadow Color: Black
Fill Color: White (have box checked)
Make sure to add your copyright info.
If you want a transparent image, then delete or hide the white background layer and save as a .png.
For this tutorial you will need the following:
Paint Shop Pro, I am using PSP X, you should be able to use any version.
Tube of choice, I am using the artwork of Ismael Rac, which you need a license to use. You can get it at AMI.
Scrap kit of choice. I am using Night Wings by Kat NKDA which is a PTU kit that you can also purchase at AMI.
Font of choice, I am using Pea Lovey Dovey
Mask: I am using the mask that came with the Night Wings kit.
Plugins: No outside filters used.
Just remember that my choices of papers and elements is just a suggestion, change it up and make it yours! You don't have to follow mine exactly.
Let's get started!
Open a new canvas 700x700 white.
Open element 13, copy and paste as a new layer and resize by 45%. Click inside it with your magic wand, selections, modify, expand by 8.
Open paper 2, copy and paste as a new layer, selections, invert, make sure the paper layer is active, and click delete on your keyboard. Leave selected
Open your tube, copy and paste as a new layer and drag it below the frame. Take your eraser and erase the bits you don't want showing at the bottom of your frame and then deselect. Add a drop shadow. I used 1, 1, 35, 6.
Now take your freehand selection tool (the one that looks like a lasso) and make sure it's set on Add(Shift) and that Feather is set to 0. Draw around the parts you want showing above the frame. Go to selections, promote selection to layer, then select none. Now move the layer you just made above the frame.
Open element 1, copy and paste as a new layer, resize by 20% then again by 40% and then sharpen. Arrange it to the left side of your frame and add a drop shadow.
Do the same with element 2, arrange it just under element 1.
Open element 10, copy and paste as a new layer, resize by 40%, add a drop shadow and arrange to the top right, drag down below the frame and paper layer.
Open element 28, copy and paste as a new layer, resize by 40%, rotate to the right by 105, add a drop shadow, drag it below your top tube layer.
Open element 15, copy and paste as a new layer, resize by 40%, add a drop shadow. Drag it below element 28 and arrange it across the bottom of your frame.
Open paper 12, copy and paste as a new layer, drag it down to just above your white background layer. Open your mask, apply by going to Layers, New Mask Layer, From Image, click on the drop down menu and find your mask, click ok. Delete the mask layer and merge the group.
Add your name to the little metal piece (element 15) that you placed at the bottom of your frame. To get the engraved look, I did the text in black and then added my drop shadow. Then applied 3D effect cutout with the following settings:
Vertical: 10
Horizontal: 10
Opacity: 50
Blur: 5
Shadow Color: Black
Fill Color: White (have box checked)
Make sure to add your copyright info.
If you want a transparent image, then delete or hide the white background layer and save as a .png.

Tuesday, May 11, 2010
Angel Wing
For this tutorial you will need the following:
Paint Shop Pro, I am using PSP X, you should be able to use any version.
Tube of choice, I am using the artwork of Ismael Rac, which you need a license to use. You can get it at AMI.
Scrap kit of choice. I am using Night Wings by Kat NKDA which is a PTU kit that you can also purchase at AMI.
Font of choice, I am using Pea Lovey Dovey
Mask: I am using the mask that came with the Night Wings kit.
Plugins: No outside filters used.
Just remember that my choices of papers and elements is just a suggestion, change it up and make it yours! You don't have to follow mine exactly.
Let's get started!
Open a new canvas 700x700 white.
Open element 13, copy and paste as a new layer and resize by 45%. Click inside it with your magic wand, selections, modify, expand by 8.
Open paper 2, copy and paste as a new layer, selections, invert, make sure the paper layer is active, and click delete on your keyboard. Leave selected
Open your tube, copy and paste as a new layer and drag it below the frame. Take your eraser and erase the bits you don't want showing at the bottom of your frame and then deselect. Add a drop shadow. I used 1, 1, 35, 6.
Now take your freehand selection tool (the one that looks like a lasso) and make sure it's set on Add(Shift) and that Feather is set to 0. Draw around the parts you want showing above the frame. Go to selections, promote selection to layer, then select none. Now move the layer you just made above the frame.
Open element 1, copy and paste as a new layer, resize by 20% then again by 40% and then sharpen. Arrange it to the left side of your frame and add a drop shadow.
Do the same with element 2, arrange it just under element 1.
Open element 10, copy and paste as a new layer, resize by 40%, add a drop shadow and arrange to the top right, drag down below the frame and paper layer.
Open element 28, copy and paste as a new layer, resize by 40%, rotate to the right by 105, add a drop shadow, drag it below your top tube layer.
Open element 15, copy and paste as a new layer, resize by 40%, add a drop shadow. Drag it below element 28 and arrange it across the bottom of your frame.
Open paper 12, copy and paste as a new layer, drag it down to just above your white background layer. Open your mask, apply by going to Layers, New Mask Layer, From Image, click on the drop down menu and find your mask, click ok. Delete the mask layer and merge the group.
Add your name to the little metal piece (element 15) that you placed at the bottom of your frame. To get the engraved look, I did the text in black and then added my drop shadow. Then applied 3D effect cutout with the following settings:
Vertical: 10
Horizontal: 10
Opacity: 50
Blur: 5
Shadow Color: Black
Fill Color: White (have box checked)
Make sure to add your copyright info.
If you want a transparent image, then delete or hide the white background layer and save as a .png.
Subscribe to:
Post Comments (Atom)
No comments:
Post a Comment