For this tutorial you will need the following:
Paint Shop Pro, I am using PSP X, you should be able to use any version.
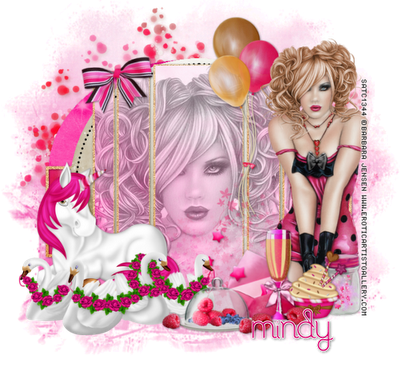
Tube of choice, I am using the artwork of Barbara Jensen which you need a license to use. Her artwork is available at her store, but this tube is available only at Scraps and the City.
Scrap kit of choice. I am using a PTU kit, Pink Fantasy by Jen's Sweet Temptations. I'm working with the full sized kit, so the resizing percents are for that. If you get the tagger sized, you'll have to change the amounts you resize by, if you have to resize at all.
Tonya and Minxy Collab Template 03 at Creative Misfits Creations. It's the last set in the post.
Font of choice, I am using zebra
Mask: Vix Big Mask 19
Plugins: no outside plugins required
Just remember that my choices of papers and elements is just a suggestion, change it up and make it yours! You don't have to follow mine exactly.
Let's get started!
Open your template, delete the copyright layer, stars, and all the word art layers.
Change the canvas size to 700 x 650.
For any shapes on the template that you fill with a paper, delete the original shape afterwards.
Make shape 1 layer active, click inside with magic wand, open paper 3, resize by 25%, copy and paste as a new layer. Selections, invert, click delete on your keyboard & deselect. Do the same for shape 2. Add drop shadow to both.
Do the same with rectangle frame and rectangle background, filling them with paper 1 resized by 25%
Add noise to both rectangle frame and rectangle background after you add the paper, uniform, monochrome checked 40%, then add drop shadow.
Make the rectangle layer active, click inside it with magic wand, open paper 4, resize by 15%, copy and paste as a new layer, selections, invert, click delete on your keyboard, deselect. No drop shadow on this one.
Do the same with the circle layer, using paper 9 add drop shadow.
Make rectangle layer active, click inside with magic wand, open paper 10, resize by 15%, copy and paste as a new layer, selections, invert, click delete on your keyboard, leave selected.
Open your close up tube, copy and paste as a new layer, arrange it in the rectangles, click delete on your keyboard then deselect.
Change the blend mode to luminance (L) and drop the opacity to about 60.
On thin rectangles 1 and 2, add noise with the same settings as above and add drop shadow.
Open your tube, copy and paste as a new layer, resize if necessary, arrange on the left side.
add elements that you like. These are the ones I used and how much I resized them by, add drop shadow to each.
Swans resized by 20%
Unicorn resized by 15%
Flower 1 resized by 15%
Bow 1 resized by 10% then 75%
Cupcake 1 resized by 10% then 55%
Envelope resized by 10% then 85%
Champagne resized by 10% then 65%
Jar resized by 10%
Decor 5 resized by 20%
Balloons resized by 20% then 50%
Raspberry 3 resized by 10% then 75%
The two raspberries, resize by 10% then 25%, arrange them duplicating and mirroring until you get as many as you want scattered about.
copy and paste a paper of your choice, open & apply mask, layers, new mask layer, from image, find your mask in the drop down menu, click ok, delete mask and merge group. You may have to resize it and duplicate it if you used a light paper.
Crop, resize, add credits and copyright as needed then add your name.

No comments:
Post a Comment